
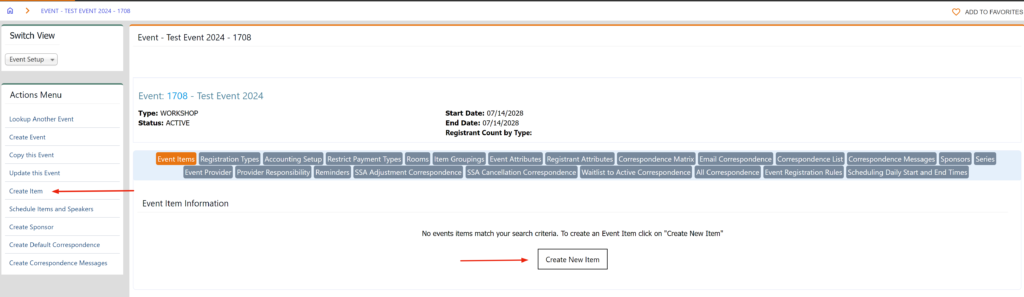
Event Items are used to represent all offerings at a given event, and are created for such things as registration, workshops, sessions, and outings.
*Note: some parameters may not exist in your environment as they have been added in the most recent versions of AA (Association Anywhere).
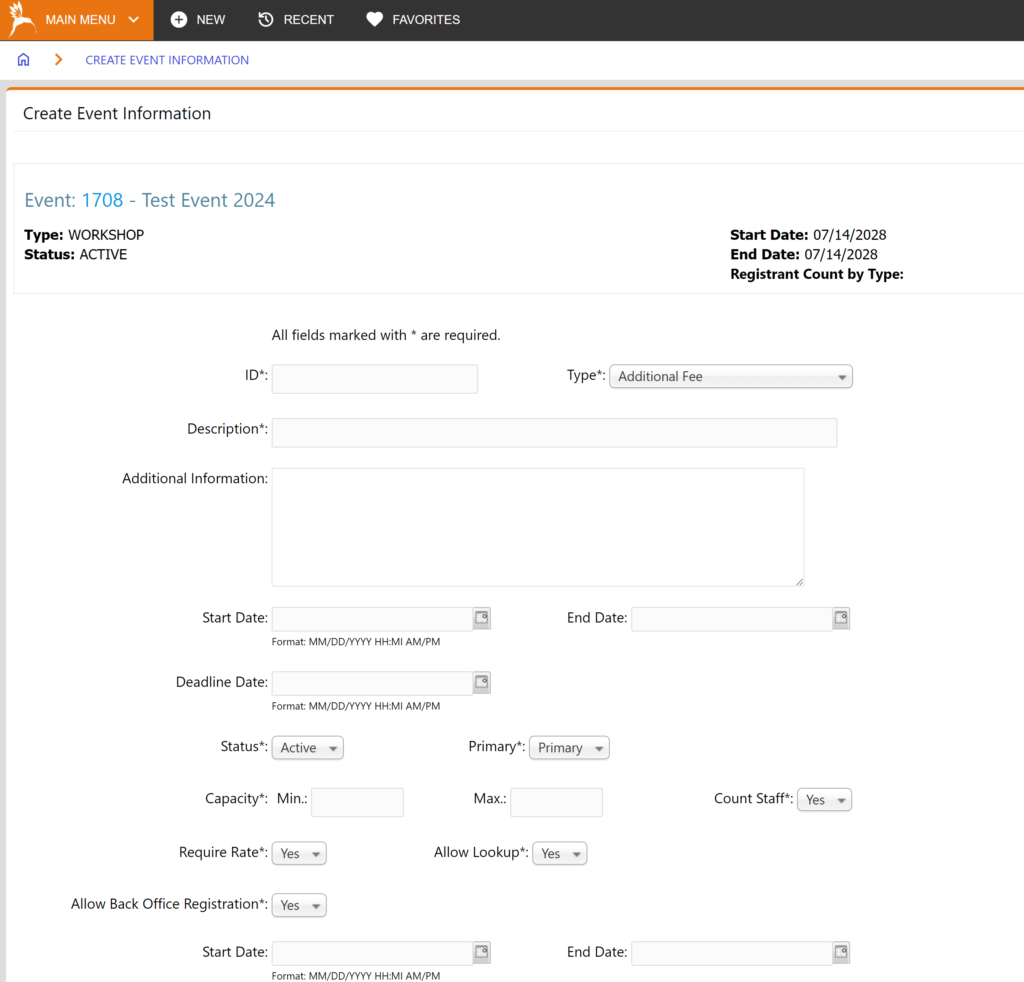
Descriptions of event item parameters
- Item ID – code used to represent specific item. This is often something like FULLREG for a full registration item, or WORKSHOP1 for a workshop session. Note: Event Item ID should be all CAPS and no spaces or special characters.
- Item Type – used to designate the type of the item. Values are defined as codes under “Admin” > “Meetings” > “Event Codes” > “Item Types”.
- Description – text description of item. This description will show up on the SSA registration screens.
- Additional Information – Used to add additional details about this event item. Text entered in the Additional Information box will appear in an info bubble next to the item in the SSA registration process.
- Start Date – The actual start time of the item.
- End Date – The actual end time of the item.
- Deadline Date – The date on which a customer could register for the item.
- Item Status – (ACTIVE/CANCELLED/TBD/WAITLIST) designates the status of the item. Must be set to ACTIVE to allow SSA registrations.
- Primary Flag – (PRIMARY/SECONDARY/OTHER) determines whether this item is a primary, secondary, or other item.
- Each registration must have exactly one primary item, so this is set to PRIMARY for mutually exclusive registration items, such as Full Registration or One-Day Registration.
- A registration may have an unlimited number of secondary items, so this should be set to SECONDARY for almost all other items.
- OTHER should only be used for items that will not be part of the normal registration process, such as the exhibit hall. OTHER should also be used for items that do not show up online and are bundled within other primary or secondary event items.
- Min Capacity – minimum allowable number of registrants. If no minimum, set to 1.
- Max Capacity – maximum allowable number of registrants. If there is no maximum, set it to a number large enough to cover the expected scenario, e.g., 9999.
- Count Staff Capacity – (YES/NO) – if set to YES, then STAFF registrations will be counted against maximum capacity. If set to NO, then STAFF registrations will not count against maximum capacity.
- Require Rate Flag – (YES/NO) determines whether a valid price must be configured for a person to register for the event. This is usually set to YES. An example of where it may be NO is an RSVP-only event for which nobody is charged to attend.
- Lookup Flag – (YES/NO) determines whether the event shows up in back-office event lookups. Should always be set to YES.
- Allow Back Office Registration or Register Flag – (YES/NO) determines whether this item is open for registration via back-office. Start Date/End Date determines the beginning and ending of registration period.
- Web Shop – (YES/NO) determines whether the event shows up in the SSA (public-facing web portal) event calendar. Start Date/End Date determines the beginning and ending of visible period.
- Web Registration – (YES/NO) – determines whether this item is open for registration via SSA. Start Date/End Date determines the beginning and ending of SSA registration period.
- Web Quantity – (YES/NO) determines whether a quantity of this item greater than 1 can be purchased via SSA. Set to NO for registrations and sessions; set to YES for ticketed events like dinners or galas for which a person can purchase additional tickets.
- Allow Additional Attendees (YES/NO) determines whether you can create a guest price for this item. It also allows the user to add additional attendees by name. However, having this set to YES will not allow you to update the quantity in the shopping cart. You need to click the guest icon next to the item in the shopping cart, add attendees by name, and that will increase the quantity.
- Exhibit Flag – (YES/NO) – determines whether this item represents the exhibition hall and will include booth sales. Set to NO for normal event items. Set to YES if this item will be used for exhibit booth sales (requires EXPO module of Association Anywhere).
- Requires Ticket Flag – for badge printing purposes *Requires additional behind the scenes format programming.
- Cancel Code – Required when updating the item status of an item to CANCELLED. Additional cancel codes can be added by going to “Admin” > “System” > “Central Codes” > “General Codes” > “Code Type: EVT_CANCELCD”.
- Room ID – The ID of the room the item is taking in place in. Rooms are configured per event under the “Rooms” sub-tab from the Event Masterfile.
- Curriculum ID – The ID of the Curriculum that is applied to the event item (for tracking credits awarded for attending the item). Curriculums are configured under “Admin” > “Education” > “Education” > “Curricula”
- Interest Code – Interest code associated with the event item. Interest codes are setup under “Admin” > “Mktg/Comm” > “Interests” > “Interests”.
- Allow Item Registrations to Overlap – (YES/NO) Setting this flag to N will not allow other items happening at the same time to be registered for.
- Item Group – The group in which the item should show up under. Groups are defined per event under the “Item Groupings” sub-tab from the Event Masterfile.
- Item Group Display Order – The order the item should display within the Item Group.