This page will instruct you on how to map the categories and levels created in Step 1 to collect the activity data.
“This feature is available for admin users only. Please contact your admin should you need further assistance.”
Attribute Pages
When entering an activity, each activity resolves to an attribute page. While it is possible to have an attribute page configured for every single entry, it is recommended that customers consolidate and make generic attribute pages as much as possible to be used across multiple activities. For example, with a file upload attribute you can call it “Supporting Documentation” and reference the acceptable types of documentation for each activity, as opposed to having a “Transcript” upload for your education activities, “Resume” for work activities, “Certificate of Attendance” for events etc. Contact your ACGI representative for additional guidance and suggestions.
To associate an attribute page with specific activities you will need to first set up an attribute page. .
Once created, the attribute page must be associated with the Activity.
Specific to attribute pages used by Transaction Activity items, the Attribute Page Usage will be:
- Package = CENTRANSACTION
- Application = CRT or SBM depending on the intended use of the Transaction Activity item and workflow configuration
- Qualifier1 = A code used to link the Page to the Transaction Activity item, e.g., EDUCATION_ACTIVITY
- Qualifier2 = A code used to link the Page to the Transaction Activity item, e.g., EDUCATION_ACTIVITY
NOTE: The values entered in the Qualifier1 and Qualifier2 fields can be the same. These values will be used later in the Transaction Point Defaults table. Attribute Qualifier1 and Qualifier2 are used across workflow configuration, attribute pages, and transaction defaults.
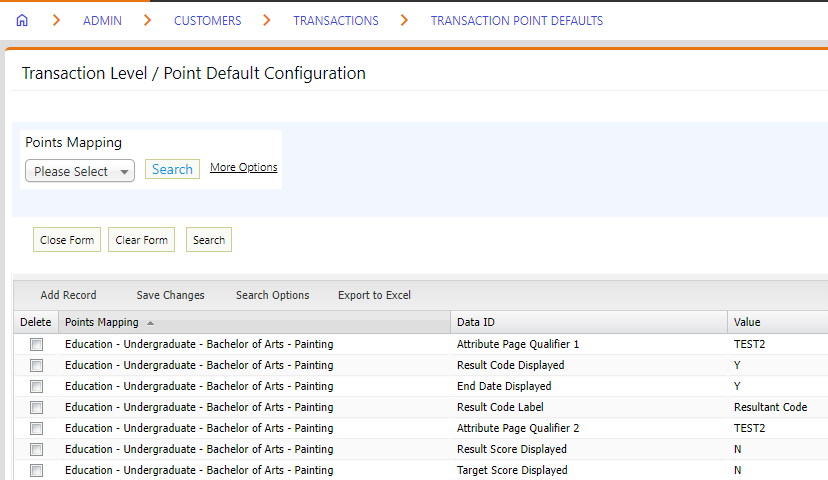
Transaction Point Defaults
Transaction Point Defaults accomplish the following based on the selection made in the Data ID column:
| Data ID | Description |
|---|---|
| Attribute Page Qualifier 1 | Associates the selected Transaction Activity item in the Points Mapping column to the attribute page with the same value in its Qualifier1 value |
| Attribute Page Qualifier 2 | Associates the selected Transaction Activity item in the Points Mapping column to the attribute page with the same value in its Qualifier2 value |
| End Date Default Value | Specify an End Date |
| End Date Displayed | Hide display of the End Date field by entering ‘N’ |
| End Date Label | Change the Label to the entered value; ex: an entry of ‘Graduation Date’ results in ‘Graduation Date’ displaying on screen to the applicant |
| End Date Required | Make entry in the End Date field required by entering ‘Y’ |
| Result Code Displayed | Display the Result Code field by entering ‘Y’ |
| Result Code Label | Change the Label to the entered value; ex: an entry of ‘Pass/Fail’ results in ‘Pass/Fail’ displaying on screen |
| Result Score Displayed | Display the Result Score numeric field by entering ‘Y’ |
| Result Score Label | Change the Label to the entered value; ex: an entry of ‘Test Score’ results in ‘Test Score’ displaying on screen |
| Start Date Default Value | Specify a Start Date |
| Start Date Displayed | Currently, entry in the Start Date field is required and a value in this field on the Transaction Point Defaults table is not advised |
| Start Date Required | Make entry in the End Date field required by entering ‘Y’ |
| Target Score Displayed | Display the Target Score numeric field by entering ‘Y’ |
| Target Score Label | Change the Label to the entered value; ex: an entry of ‘Passing Score’ results in ‘Passing Score’ displaying on screen |
To enter Transaction Point Defaults:
- Access the back-office menu at “Admin” > “Customers” > “Transactions” > “Transaction Point Defaults”
- Select the Transaction Activity item in the Points Mapping column, this is a dropdown that shows all the previously set up Transaction Point Definition combinations (Step 2 – 2. Customer Activity: Transaction Point Definition)
- Select the appropriate value in the Data ID column, see list above
- This can be a combination of the above Data IDs
- NOTE: At a minimum, each Transaction Activity resolving to an attribute page will have a value for both Attribute Page Qualifier1 and Attribute Page Qualifier2
- Enter the intended value in the Value column
- Click Save Changes
- Repeat steps as needed